


Cheap DIY kitchen cabinet add-ons are a great way to revamp your space and make it work better for you-without breaking the bank.

Cheap DIY Kitchen Cabinet Add-Ons
1
/
10

Build Rollouts in Underused Locations
The space under sinks is often overlooked, but it’s prime real estate for rollouts. These cheap DIY kitchen cabinet add-ons can transform that ‘I’m not sure what’s under there’ storage space into an organized and efficient location for cleaning supplies that lets you see all your supplies at a glance.
Rollout Storage Panel

Keep small stuff from getting lost in deep base cabinets. If you know how to mount a slab of plywood on drawer slides, you can take advantage of all the nifty shelves, hooks and holders sold at home centers. It’s easy as long as you remember two critical things:
First, make sure the drawer slides are parallel. Place a plywood spacer between the drawer members as you screw them to the panel. Screw the cabinet members to cleats. Second, make your cleats thick enough so that the slides will clear the cabinet door hinges. (We glued 1/2-in. plywood to 3/4-in. plywood to make my cleats.)
To install the panel in the cabinet, reassemble the slides. Hold the whole assembly against the cabinet wall and slide the panel out about 4 in. Drive screws through the cleats at the rear, then slide the panel out completely and drive screws at the front.

Rollout Drawer for Lids
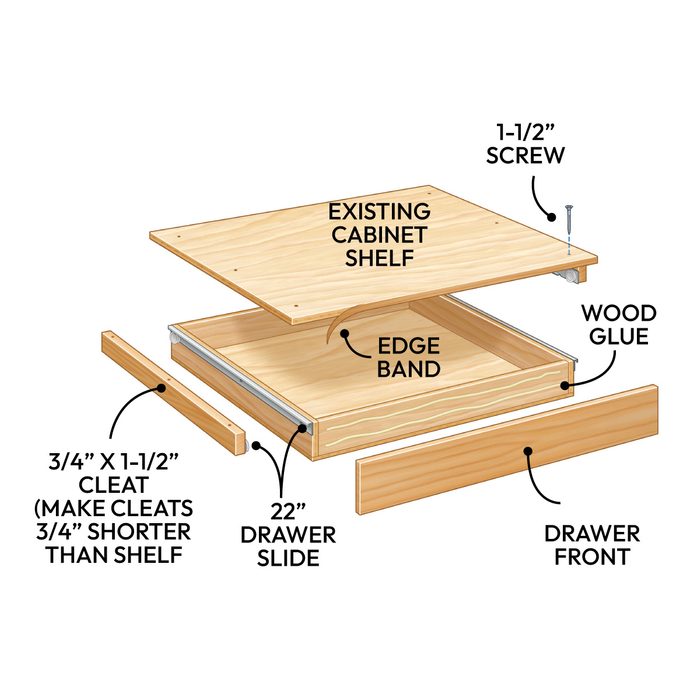
You can mount a drawer for pot lids under your pot shelf—or under any other cabinet shelf. Before you remove the shelf, put some pencil marks on it to indicate the width of the cabinet opening at its narrowest point (usually at the hinges). Your drawer front and slides can’t extend beyond those marks (or you’ll spend hours building a drawer that won’t open). Then remove the shelf. If it’s made from particleboard, we recommend that you replace it with 3/4-in. plywood and transfer the marks to the new shelf. If you can build a simple drawer box, the rest will be easy. Mount the drawer on cleats screwed to the cabinet sides.
2
/
10

Cabinet Door Knife Rack
You can size a knife rack to suit any cabinet door and any number of knives for kitchen cabinet storage. To build this cutting board turned knife rack, you just need a table saw and wood scraps. Run the scraps across the saw on edge to cut kerfs. Adjust the blade height to suit the width of the knife blades. You have to remove the saw’s blade guard for these cuts, so be extra careful. Also cut a thin strip to act as an end cap. Glue and clamp the kerfed scraps together and sand the knife rack until the joints are flush. To mount it, use two 1-1/4-in. screws and finish washers.
3
/
10

Wine-Glass Molding
T-molding designed for wood floor transitions makes a perfect rack for stemware. Just cut it to length, predrill screw holes and screw it to the underside of a shelf. For a neater look, use brass screws and finish washers. Prefinished T-molding is available wherever wood flooring is sold.
4
/
10

Cutting Board Rack
You can make this nifty, inexpensive rack and mount it inside a cabinet door to stash your cutting boards out of sight. It goes together in a snap since it only requires a 6-ft. 1×2 and two L-brackets. Measure between the door stiles to get the maximum width of your rack. Make sure the rack will be wide enough for your cutting board (or spring for a new one). You’ll also need to mount the rack low enough so it doesn’t bump into a cabinet shelf when the door closes. Cut the bottom and face rails to match the space between the cabinet door stiles. Cut the sides 7-1/4 in. long. Nail the sides to the base. Then, nail the two face pieces at the top and bottom to complete the rack (photo, left). The easiest way to mount the rack is to take the cabinet door off its hinges and lay it down. Predrill the screw holes for the L-brackets and mount the rack to the cabinet door using a 1-in. L-bracket centered on each side of the rack.
5
/
10

Cookware Organizer
Most kitchen base cabinets lack vertical storage space for big, flat cookware like cookie sheets and pizza pans. To provide it, just remove the lower shelf, cut a vertical panel of plywood and fasten it at the cabinet bottom with furniture braces and at the top with a strip of wood. Drill holes for the adjusting pins to match the original locations and trim the shelf to length.
6
/
10

Add in Dividers
You’re not limited by the existing layout of your drawers and cabinets. If it makes more sense to install cheap DIY kitchen cabinet add-ons like dividers to keep the space organized, then go right ahead.
Dividers for Upright Storage

Of course, the pan or tray you need is always the one at the bottom of the pile! Here’s the solution: Store large, flat stuff on edge rather than stacked up. That way, you can slide out whichever pan you need. Cut 3/4-in. plywood to match the depth of the cabinet, but make it at least an inch taller than the opening so you can fasten it to the face frame as shown. Drill shelf support holes that match the existing holes inside the cabinet. Screw two brackets to the cabinet floor; one to the face frame and one to the back wall of the cabinet (not shown). Finally, cut the old shelf to fit the new space.

Divide Deep Drawers
Deep drawers often contain a jumbled pile of interlocking utensils. Our solution is a sliding tray that creates two shallower spaces. Make it 1/8-in. narrower than the drawer box, about half the length and any depth you want (ours is 1-3/4-in. deep). When you position the holes for the adjustable shelf supports, don’t rely on measurements and arithmetic. Instead, position the tray inside the drawer box at least 1/8-in. lower than the cabinet opening and make a mark on the tray. Our shelf supports fit tightly into the holes, but yours may require a little super glue. This simple drawer rests on shelf supports.
7
/
10

Under-Sink Storage Bins
What’s hiding under your kitchen sink? If the space under your sink is anything like ours, it’s an overcrowded jumble of cleaning supplies, sponges and plastic bags. Here’s some cheap DIY kitchen cabinet add-ons that are a great way to store these items right on the door of the sink cabinet. Cut a plastic storage tub in half with a utility knife and screw it to the inside of the cabinet door through the plastic lip at the top of the tub. Just make sure you position it so you can shut the cabinet door when all your bags and other supplies are in the bin.
8
/
10

Cabinet Door Measuring Cup Storage Rack
Free up pantry storage space by hanging measuring cups inside a kitchen cabinet. Position and mount a wood strip so that the cups will hang between the shelves and allow the door to close completely. Mount a second strip for your measuring spoons, then screw in cup hooks on both strips.
9
/
10

Cabinet Door Message Board
A sheet of metal and a dry-erase board can turn any cabinet door into a convenient message center. You’ll find 2 x 2-ft. lengths of plastic-coated hardboard (often called ‘whiteboard’) and sheet metal at a hardware store or home center. Larger hardware stores will cut the sheet metal to your specifications. Be sure to get steel instead of aluminum so magnets will stick. If you cut the metal yourself, wear gloves to protect your hands and use tin snips carefully. Use a metal file to smooth any ragged edges. If you don’t have a table saw to cut the whiteboard, flip it over, mark your measurements and use a jigsaw to cut it from the back to prevent chipping or splintering. To get a straight cut, use a framing square as a guide (photo, left).

To mount the metal sheet and whiteboard to the inside of the door, take the door off its hinges, lay it flat and carefully mask off the area where you want to spray the adhesive. Follow the directions on the can to apply the adhesive to the door, metal and whiteboard (photo, right). Mount the pieces, press firmly and let dry.
10
/
10

Storage Behind Closed Doors
No list of cheap DIY kitchen cabinet add-ons would be complete without a pegboard. This material is great for organizing kitchens, laundry rooms and bathroom cabinets. Rout a groove in a 1×2 frame using a rabbet bit, attach the pegboard with glue and brads, then mount it to the door. The frame helps support the edges of the pegboard and creates a 1/2-in. space behind the board so pegs can be inserted.